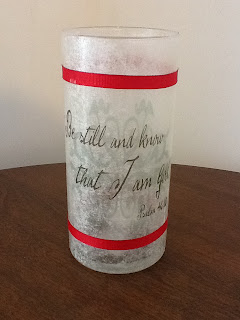
Last year, I made some luminaries as a gift by decoupaging snowflake tissue paper to a glass candle holder. So when we had a Ladies Retreat this fall, this was the first craft that I thought of doing. However, in the meantime, I started using Pinterest. So, I kept coming across tons of ideas that made this idea evolve into something a little different: Bible Verse Candle Holders.
I found out how to print on tissue paper. Basically, you cut the tissue paper a little longer, but no wider than a piece of 8.5 x 11 piece of card stock. Then you tape both ends of the tissue paper around the top and bottom edge of the card stock to the back of the card stock. Then print on it just like regular paper. Be sure you know which direction to insert it so you don't end up printing on the wrong side.
Then, I found some neat Bible verse printables from these websites:
Angel Navy Wife
Papercraft Memories
I also used PicMonkey to make my own Bible verse printable.
Supplies for printing:
tissue paper (plain or patterned)
card stock
scotch tape
scissors
Supplies for the candle holder:
cylindrical candle holder (you can find them at dollar stores or craft stores)
printed tissue paper
decoupage glue (like mod podge)
foam brush
embellishments (ribbon, diamond dust, buttons...)
1. After you print the Bible verse onto the tissue paper, cut the paper off the card stock and then cut it to fit around the candle holder (leave a little space at the top and bottom).

2. Set the tissue paper upside down on the table, then line the candle holder on top of it so that it will wrap around correctly. Then, use a foam brush to lightly paint some decoupage glue to one vertical strip (about an inch wide) of the candle holder. Then, carefully press the end of the tissue paper onto the glue.
*BE VERY CAREFUL: The tissue paper will tear if you use too much glue or if you press too hard. If it tears, take it off (wash it with water) and start again with a new piece of tissue paper.

3. When the end is secure, lift the loose end of the tissue paper and lightly apply another strip of decoupage glue (next to where it is already secure).

4. Hold the glass sideways so that the tissue paper hangs down without touching the glue.

5. Carefully press the tissue paper to the glue with your finger. Slowly turn the glass as you secure the tissue paper to it.
6. Continue around the candle holder until all of the tissue paper is glued down. To hold the candle holder, just put your hand inside. I usually overlap it at the end.
7. Once the tissue paper is fully attached, allow it to dry for at least 30 minutes. Then, apply another layer of glue over the tissue paper. You can put the decoupage glue on a little thicker this time. Allow it to dry for 30 minutes again.
8. Repeat until you have at least 3 layers of decoupage glue on top of the tissue paper.
9. You can add embellishments using glue (I just stuck the ribbon onto the top layer of decoupage glue, but you may want to use tacky glue if you add anything heavier).
If you add diamond dust to cover the whole candle holder, paint a full layer of decoupage glue and then sprinkle the diamond dust over it and then shake off the excess (do this over newspaper so that you can pour the extra back into the container).
If you add diamond dust to just certain spots (like the one on the right), allow the previous layers to dry very well (so they are not tacky to the touch). Then, paint glue just on the place you want to have the diamond dust. Sprinkle the diamond dust over it and shake off the excess.
This craft worked great for our Ladies Retreat because we could add another layer between our Bible studies and other activities. They also make great gifts. I hope you enjoy it as well.
If you try this, let us know what you learned. Also, if you added anything to this craft or altered, what you did differently and how it turned out.
UPDATE:
UPDATE:
After a comment about using vellum instead of tissue, I tried it with some vellum that I had on hand (it wasn't printable vellum so I couldn't print a picture or a Bible verse on it). It worked, but it was more difficult to avoid bubbles. The paper didn't tear as easily as tissue paper. Here is a picture to show you how it turned out. I imagine that with a little practice it could decoupage the vellum as well as I can decoupage the tissue paper.


No comments:
Post a Comment