Tuesday, 7 June 2016

Jesus said "I am..." - Lesson 4 - The Resurrection and the Life

Lesson: I am the Resurrection and the Life

Introduction: Use the flannelgraph pieces from My Wonder Studio to tell the story of Jesus raising Lazarus from the dead.

In John 14:19, Jesus said "Because I live, you will also live."
Watch a video about the resurrection of Jesus.


Craft:  Resurrection garden

Resurrection Mini Garden with crosses, symbolic plants, and empty tomb

     Materials:

  • Pot or tray for planting
  • sticks to make crosses
  • string to tie crosses together
  • potting soil
  • small pot
  • rock about the size of the top of the small pot
  • mini garden plants: palm-type plant, plant with red leaves or flowers, plant that has thorns (some succulents would work as well)
  • optional pebbles for a pathway
  • optional boy/girl figurine and bench
  • optional grass seed or moss

Have the kids put the soil in their pot and put the small pot sideways and cover the sides so it looks like a tomb in a hillside.  Set the rock near the opening of the tomb.  Make three crosses from sticks and twine and stand them up in the back of the garden.  Then, plant the plants around it.  Discuss the significance of each type of plant: palm plant for the story of palm Sunday, thorns for the crown of thorns, and a red plant for Jesus paying for our sins with his blood.    If desired, add a pebble pathway to the tomb, a figurine looking at the tomb, and/or grass seed or moss to cover the dirt.

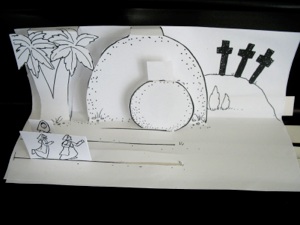
Alternative craft: Pop-up Resurrection Scene from amysfreeideas.com.


Song:  Sing a song of John 11:25-26 like one of these


Closing:
Put the following questions on paper in a hat and have a student pick out a question to answer.

  1. What is resurrection?
  2. How do we get to live forever?
  3. When does eternal life begin?
  4. Name as many people who were resurrected as possible?
  5. Say or sing John 11:25.
  6. Who did Jesus raise from the dead in the story?
  7. Who were Lazarus' sisters?
  8. Why was Jesus able to raise Lazarus from the dead?

What activities, crafts, snacks, and songs have you used to help teach about Jesus being the Resurrection and the Life?  Share them in the comments below.


Here are links to all the lessons in my Jesus Said "I am..." Bible Lessons Unit:

Monday, 6 June 2016

Jesus said "I am..." - Lesson 3 - The Door and the Good Shepherd

Lesson 3: The Door and the Good Shepherd

Introduction:  "Find the lost sheep" Game from sermons4kids.com
Print out the pictures of the sheep from the link above.  Cut them apart and hide them around the room before the class.  Then, have the students find the lost sheep.

Play a video that introduces John 10:1-21, like the following one from The Global Gospel.


Discussion:  Have the students name the four characters of the parable (the shepherd, the sheep, the thieves, and the hireling) and write them on four sections of a chalk or white board.  Help them figure out what each character represents.  Read the passage of John 10:1-21 and have the students name the characteristics of each character from the passage.  Mention how the characteristics fit with the person each character represents.

Snack and Craft:  Talk about how Jesus is both the Good Shepherd and the Door.  The shepherd would sleep at the doorway and be the door that keeps the sheep in and danger out.  Make a sheep pen with foam board and pipe cleaners like the one at Catholic Icing.  Also, make the shepherd.  Instead of making the paper sheep, make marshmallow and pretzel sheep like these from whosthefarris.com.  Then, use the shepherd the shepherd to be the gate of the sheep pen (and of course eat the sheep).

Craft for John 10 - Jesus is the good shepherd and the door with sheep pen and marshmallow sheep


Read them the parable of the Lost Sheep from a children's book or children's story Bible.  Here are some examples:


Activity:  "My sheep know My voice" game
Blindfold a child.  Choose two or three other children to give the child directions to the blindfolded child.  One child is chosen to give the correct directions and the other children should try to lead the blindfolded child astray.  The blindfolded child is told to only listen to the voice of the one child and ignore the other voices.  Then, switch which child is blindfolded and which give the directions.  

Craft:  "I am the Door" craft from Bible Today 4 Kids.  
Print out the sheet of the craft for each child and have the children cut open the door on the dotted red line and glue everything but the door to another piece of paper.  Then, they can open the door and write "Jesus said 'I am the Door' John 10:9".  

If you have extra time, the kids love to take turns hiding and finding the sheep from the introduction.

How have you taught this lesson?   What activities, crafts, snacks, and songs did you use?  Share your experiences in the comments below.


Here are links to all the lessons in my Jesus Said "I am..." Bible Lessons Unit:


**  Scripture And... is a participant in the Amazon Services LLC Associates Program, an affiliate advertising program designed to provide a means for sites to earn advertising fees by advertising and linking to amazon.com.

Friday, 3 June 2016

Jesus said "I am..." - Lesson 2 - The Light of the World

Lesson 2: The Light of the World


Introduction:  Set up an obstacle course and have the students go through it.  Then, turn out the lights and have the students try the obstacle course in the dark (Remember safety, having them take turns and tell them a word to say to turn on the light if they have a problem).  Ask them if the obstacle course was more difficult without light and why.

Have students read the following passages:

  • John 1:1-9
  • John 3:19-21
  • John 8:12
  • John 12:35-36
  • John 12:46


List what it means that Jesus is the light of the world:

  • Shows the way
  • Shows bad things and keeps people from doing bad things (like security lights)
  • Overcomes evil (sin)


Craft:  Lighthouse from pbs.org

Lighthouse craft made out of plastic cups and LED tea light for Jesus is the Light of the World

     Materials: 
  • red plastic cup
  • smaller clear plastic cup
  • battery operated tea light
  • white tape
  • black tape for windows and door, optional
  • plastic plate
  • glue
  • paint brush
  • sand
  • sea shells

      Directions:
  1. Tape white stripes on the red cup.
  2. Over newspaper, paint glue onto the plate and cover with sand.  Dump and shake off any extra sand.  Glue on some seashells.
  3. Place the cup on the plate.  Put the tea light on top.  Put the clear cup over the tea light.

Discussion:  Read Matthew 15:14-16.  Ask the kids how we can be a light like Jesus.

    Craft:  Light switch cover


    Decorate a light switch cover/plate with sharpie markers.  Have them write "You are the Light of the World" and decorate it however they want.  I would recommend spraying on a layer of clear acrylic paint to keep the marker from rubbing off.  They can take it home and their parents can replace their previous light switch plate with this one to remind them to be a light just like Jesus.

    Song:  This Little Light of Mine

    If you have extra time, the kids love taking more turns on the obstacle course.

    How have you taught your students that Jesus is the light of the world?  What activities, songs, and crafts have you used?


    Here are links to all the lessons in my Jesus Said "I am..." Bible Lessons Unit:

    Thursday, 2 June 2016

    Jesus Said "I am..." - Lesson 1 - The Bread of Life

    If you have followed my themed Children's Bible lessons, then you will enjoy the next theme.  There are seven passages in the Bible where Jesus said "I am the..."

    John 6: 35, 48   I am the bread of life 
    John 8: 12; 9:5   I am the light of the world 
    John 10:9   I am the door/gate 
    John 10:11   I am the good shepherd 
    John 11:25   I am the resurrection and the life 
    John 14:6   I am the way, the truth, and the life 
    John 15:1   I am the true vine

    I thought they would make a great themed unit for the kids, so I broke it into six lessons (combining the door/gate and good shepherd from John 10 into one lesson) and started having fun finding ideas on Pinterest.  Don't you just love Pinterest?  Of course, things needed to be altered and tweaked, but I love all the fun activities and crafts that we did.

    Lesson 1: The Bread of Life

    Introduction:  

    I used the following video from Kids on the Move as an introduction:


    Then, I asked the kids what the people probably were thinking after that miracle.

    Next, I showed this video from Crossroads Kids Club, about how following this miracle they crossed the sea and Jesus and Peter walked on water.


    Then we did a "Readers Theater" style skit that I created for the passage that follows where Jesus said "I am the bread of life."

    After we talked about how Jesus is the bread of life, we made these cute necklaces out of bread.

    Bible verse necklace craft - the clay is made out of bread and glue with John 6:35 on the back

    Bible verse necklace craft - the clay is made out of bread and glue with John 6:35 on the back

    I had seen something similar sold on Etsy, but stamped on clay.  Then I saw that you can make clay out of bread and glue at Kid World Citizen and Can't Stop Making Things.  Here is what I did:
    1. Have the kids remove the crust from a piece of white bread.  Then, they should shred it into tiny pieces.  The smaller the pieces are the smoother the dough will be.  If you have young or impatient kids, you can make bread crumbs by putting crustless white bread into a food processor.
    2. Add 1/2 to 1 Tablespoon of glue and a drop of dishwashing liquid to the crumbs and have the kids knead it until it is smooth clay.  The dishwashing liquid keeps the clay from 
    3. Roll the dough flat with a rolling pin and cut out a bread shape.  
    4. Use a stylus, stick or pencil to press the words into the dough.  I liked the look of stamping, but couldn't find any letter stamps that were small enough to fit.  If you want the words darker you can use a sharp tipped marker.  Press a hole in the top for a string if you are making a necklace (or you can glue a magnet to the back instead).
    5. Allow the dough to dry for one or two days on a cooling rack or flipping them halfway.
    6. Coat it with clear nail polish to keep it from molding, making sure to cover the edges.  The picture about was taken when the necklaces were about 7 months old.
    While the kids are working on their necklaces, ask them what it means to them that Jesus is the bread of life (He gives them eternal life, He died so they can live, He quenches our spiritual hunger and thirst,...)

    What activities, songs, and crafts have you used for teaching that Jesus is the bread of life?  Share them in the comments below.


    Here are links to all the lessons in my Jesus Said "I am..." Bible Lessons Unit:

    Tuesday, 31 May 2016

    Memorizing the Books of the Bible

    Last summer, I set a goal for my 7-year-old son to memorize the books of the Bible.  My son memorized them, and here are the resources that I used to help him accomplish that goal.

    The Books of the Bible song from Readeez


    Books of the Bible cards from ministry-to-children.com

    We used these cards to sort them, to put them in order and even to play the game "Spoons".


    We played an active Bible book category game in our driveway, 
    using the idea from Almost Unschoolers.


    We organized books of the Bible using clothespins and hangers, 
    using this idea from Sunday School Craft Corner.


    You could also try using these products from Family Christian Stores:


    The Books of the Bible ChartThe Books of the Bible Chart
    Reproducible worksheets on back


    Books of the Bible RulerBooks of the Bible Ruler
    Perfect for Bible study, this all-purpose ruler includes the Books of the Bible (Old and New Testament). Six straight edge on one side and scalloped edge on the other side for precise underlining. Also an ideal bookmark. Comes in assorted colors.


    Bookmarks - Books of the Bible - Package of 25Bookmarks - Books of the Bible - Package of 25
    Packet of twenty-five bookmarks that list the books of the Bible and separates them by Old and New Testament. It also writes the names of the major and minor prophets through the Old and New Testament.


    **This page contains affiliate links, meaning that I receive a commission if you buy these products by clicking on the links above.  However, this post is not sponsored and I really do love these products.  Click here for my affiliate disclosure.

    A Review of NKJV Adventure Bible

    A few years ago, I decided my 7-year-old son needed a new Bible.  He had received a simple King James Bible as a gift, but it had no extras and I knew he had difficulty understanding it.  We had used several Children's story Bibles, but I wanted him to be able to read actual Bible verses on his own and also be able to participate in Bible reading during Sunday School classes and Bible studies.  So began my search for just the right Bible for my son.

    Since I am a little hyper on researching things, I thought that I'd share our experience by reviewing the Bible we selected: the NKJV Adventure Bible.

    First, a little about my son.  He is very advanced in his reading skills, so though he was in first grade, he probably read at least a 4th-grade level.  However, he is still a second grader, so he wanted lots of color, pictures, and explanations.  He also wanted it to look interesting.

    Now, my husband and I had some ideas of what we thought he should have as well.  We wanted a literal translation of the Bible, not a paraphrase.  Study notes or explanations was also something we were looking for.

    Choosing a Translation

    Click here for an awesome guide to different Bible translations.

    My husband and I both grew up with King James Bibles (a literal translation).  Through my teen years, I used a New International Version (a dynamic translation).  When I studied at Cairn University (then Philadelphia College of Bible), I used a Scofield New American Standard Bible.  Since I used so many different translations, my Bible memory is a mess with Bible verses that were mosaics of different translations.  I was hoping to pick a translation for my son that my son won't have to change in a few years.  If he was younger or had more trouble reading, we may had chosen the NIrV for early readers, but he was advanced enough to read a more difficult translation and preferred a translation that he would grow into rather than one that he would grow out of.

    Both my husband and I prefer literal translations.  As Paul states in Galatians 3:16, even whether a word is singular or plural is important.  However, we agreed that King James is just too difficult.  With its 12th-grade reading level and archaic language, it is not easy for a child to understand.  Unfortunately, NAS isn't much better with its 11th-grade reading level.  The options for literal translations that were at lower reading levels were English Standard Version and the New King James Version, which are both about 8th-grade reading levels.

    Choosing a Children's Bible

    I began looking at children's Bibles online.  We looked at the NKJV Fire Bible, but my son wasn't thrilled with the look.  I know that is superficial, but he won't read it if he isn't excited about it.  We also looked at the NKJV Study Bible for Kids.  It looked closer to our expectations, but seemed a little too old for him.  I would definitely consider it for an 8-12-year-old.  The Adventure Bible seemed similar but more geared to my son's age (It also says 8-12 but the jungle theme just made it look more interesting for my 7-year-old).  It had color on every page, book introductions, little boxes with explanations about the passages, and even a concordance.  Since it came in NKJV, it was exactly what we were looking for.

    NKJV Adventure Bible

    What we like about the Adventure Bible

    My son's favorite thing about the Adventure Bible is the full color.  When I mentioned that I was reviewing his Bible, his first comment was about the color.

    He also loves the boxes with explanations, especially the "Life in Bible Times" sections.  Amazingly, there are very few pages without one of the full-color sections.  These help my son understand so many things about the Bible and help keep him interested.  The different sections included in the Adventure Bible are:
    • "Life in Bible Times" - explains life in ancient times
    • "People in Bible Times" - discusses more in depth about Bible characters
    • "Did You Know?" - provides neat facts
    • "Let's Live It!" - helps kids apply what they are learning
    • "Words to Treasure" - good verses to memorize

    NKJV Adventure Bible | scriptureand.blogspot.com

    NKJV Adventure Bible | scriptureand.blogspot.com

    NKJV Adventure Bible | scriptureand.blogspot.com


    I like the book introductions.

    NKJV Adventure Bible | scriptureand.blogspot.com


    Having a concordance is also helpful.  I wanted to show him to use one anyway.
    NKJV Adventure Bible | scriptureand.blogspot.com

    It even has a subject index for the notes.
    NKJV Adventure Bible | scriptureand.blogspot.com

    The maps are always fun and much enjoyed by kids.
    NKJV Adventure Bible | scriptureand.blogspot.com

    Also, the 20 special pages are great, highlighting important Bible passages or lists.
    NKJV Adventure Bible | scriptureand.blogspot.com


    How the Adventure Bible could be improved

    One thing I missed in the Adventure Bible, was cross-references.  I think it is very helpful to look at cross-references to find what other verses say about a topic.  However, this is something that is not really available in children's Bibles.  It seems they are not added until teen Bibles.  While I understand why they don't include them, I wish they were in there for me to teach my son about them.

    Also, after more than a year of a lot of use, the binding of the hardcover NKJV Adventure Bible is wearing some in the corner.  It is still definitely usable and not going to fall completely apart.  Maybe I should have chosen the imitation leather cover for it to hold it better.  However, it is good to see that my son uses it enough to be causing some wear.

    Also, the hardcover Adventure Bible cover seems to be more for boys.  I could definitely see girls being interested in its content, but they might not be as excited as boys with how it looked.  They do have an imitation leather version in pink and in blue.

    Bottom Line

    While there may be other children's Bibles that would work for this age, I do not hesitate to recommend the NKJV Adventure Bible.  As I said, if you are buying it for a girl, they would probably prefer the pink imitation leather look over the hardcover.
    NKJV Adventure Bible
    NKJV Adventure Bible


    If your child is younger or struggles with reading, the NIrV Adventure Bible for Early Readers may be just the thing.  However, I would recommend getting a literal translation once your child is able to understand it.
    NIrV Adventure Bible for Early Readers NIrV Adventure Bible for Early Readers - Brown/Blue LeatherSoft NIrV Adventure Bible for Early Readers w/ Elastic Closure - Pink/Purpl
    NIrV Adventure Bible for Early Readers


    **This page contains affiliate links, meaning that I receive a commission if you buy these products by clicking on the links above.  However, this post is not sponsored and I really do love the products that I review.  Click here for my affiliate disclosure.

    Thursday, 3 September 2015

    5 Homemade Christmas Presents (with links to instructions)

    5 DIY Christmas Presents | scriptureand.blogspot.com


    Here are some more Christmas presents I have made:

    Bible Verse Candle Holder
    http://scriptureand.blogspot.com/2012/09/bible-verse-candle-holders.html

    Shirred Pillow Case Dress
    (with bought leggings)
    Pillowcase dress | scriptureand.blogspot.com

    Sippy Cup/Bottle Leash/Harness
    Sippy Cup Leash | scriptureand.blogspot.com

    Sippy Cup Leash | scriptureand.blogspot.com

    Crocheted Towel Holder 
    Crocheted Towel Holder | scriptureand.blogspot.com

    Crocheted Towel Holder | scriptureand.blogspot.com

    T-shirt Scarves

    T-Shirt Scarves | scriptureand.blogspot.com

    Friday, 24 July 2015

    Classroom Management Tips

    At the end of the last school year, I felt it was time to move on to another school within our county. I had to interview for the position, and it brought forth a lot of exciting feelings and reminders about why I love being a classroom teacher! My last interview was 8 years ago, so during this recent interview, I found myself much more prepared and able to share so many things I have learned. One of those things was about a strength of mine - classroom management.

    Time and time again, people have commented positively about my classroom management skills; however, I never realized this was a strength of mine, as they are things I do without really thinking about them - I guess they are automatic and just come naturally. To me, when someone mentions something I do, I just tell them that it just "makes sense." Since classroom management can make or break a teacher, I wanted to share some of the little things I do that make a BIG difference. Below, I will speak MOSTLY from an upper grades teacher perspective, but know that these same principals I have established were also used during my time as a Kindergarten teacher ;)


    Building Regular Routines:

    • Homeroom Arrival - model and show students what is expected as soon as they walk into your classroom; have visuals listed or a chart listed with step-by-step what should be done; once you teach and show students the routine, do not allow them to disrupt it - meaning, if they come and ask you what to do or if they forgot, simply point to the chart. If you stop to show them and not let them think and figure it out (remember you modeled it for them) then they will depend on your to do this any time. My arrival procedures are as follows: 
    1. Place all notes to teacher or $ to teacher in the designated basket.
    2. Sharpen pencils and prepare all items for the day.
    3. Use the restroom.
    4. Begin morning work.
    • Final Dismissal - model and show students what is expected as soon as they walk into your classroom; have visuals listed or a chart listed with step-by-step what should be done; once you teach and show students the routine, do not allow them to disrupt it - meaning, if they come and ask you what to do or if they forgot, simply point to the chart. If you stop to show them and not let them think and figure it out (remember you modeled it for them) then they will depend on your to do this any time. My arrival procedures are as follows: 
    1. Upon teacher's direction, pack your items in book bag.
    2. Clean up any trash in and around your desk.
    3. Stack your chair and any chairs in your pod.
    4. Car riders line up (tell designated spot); Bus riders line up (tell designated spot).
    • Class Changes Arrival - If you are departmentalized, you will have students coming and going from your class. In order to keep you sane, and to maximize time, you will want to list the TOOLS needed for class. That way, you can train them to look as they enter the room and have those items ready as they are getting seated. This saved TONS of time!! For example, under TOOLS, I might list one day: Reading Notebook, Pencil, Sticky Notes. OR another day I might list: Check out Chromebook, Reading Notebook (all depends on that day's lesson). 
    • Class Changes Dismissal - Same is true for dismissal... if you want to save time, have a PLAN! I always have my phone set for 5 minutes before switching classes. Once this song begins playing, students will wait for my "go" and they know to do the following: pick up trash in their area, collected their materials and return my materials, stand behind chair for table dismissal. 
    • Supplies - I have supplies for the class, rather than making students carry their own or having any in pods. MOST students will carry crayons or colored pencils with them, so this is the only thing I do not have. This has worked for me, and has worked well. Why change it if it works!! Due to having a class set of materials, students have the freedom to come and go to get what they need. I provide: scissors, stick glue, tape, sticky notes, highlighters, hole punch, pens, etc. The only thing they MUST sign out and back in is if they borrow a pen ;) This holds them accountable. Once I teach them this, they do it quickly and quietly, if needed. I may have 1-2 students needing to do this each class.
    • Writing Utensils: I DO NOT allow students to sharpen pencils during precious class time; therefore, I do have pens in my supply area for students IF their pencil breaks and they do not have another pencil or if they misplaced theirs, they KNOW (as I model this) not to ask me for one... but they simply sign one of my pens out and back in upon dismissal. 

    Gaining Attention/Sustaining Engagement:

    • Eyes on Teacher - This is a biggie in any classroom. You MUST have a way to get the students' attention, especially if you have a bunch of talkers! I have used many different chants, but my favorite has to be one that I allowed the students to help me come up with... "Hold up wait a minute, let us put some Fulbright in it!" I say: Hold up wait a minute; They say: Let us put some Fulbright in it. It is fun, and they LOVE it. The alternative (very quick one) I sometimes still use is 1, 2, 3, eyes on me! Find a chant you like, and stick with it. Again, train the kids or it will NOT work ;)
    • Group Work - TEACH the kids how to work in a group by setting criteria for group work - meaning, ask them what it should look like and sound like if they are working in a group. Based on their responses, create a chart. Using the words GROUP can also be a great way to set criteria. Each letter can represent something for group work. Practice and refer back to chart often. 
    • Partner Work - Practice how to work in partners. Assign partners OR have random partners... either way, set criteria to ensure that BOTH people participate equally. 
    • Model/Enthusiasm - To keep students engaged, model, model, model HOW and HOW NOT to do things. Show some enthusiasm and they will want to stay with you and participate. Find out about your students so you can also incorporate their interests to sustain their attention:) 
    • Use Visuals - Another thing that keeps them engaged is the use of visuals, plus it will assist your ELL and Special Needs students. 
    • Change it up - Change up lessons... have individual tasks, group task, tasks that involve movement from time to time, tasks that involve music, use technology, etc. SPICE IT UP ;) That way, they will always want to see what's going to happen in your class each day! 

    Behaviors:

    • Relationships - I consider this a management skill. Building positive relationships with students is KEY to success in the classroom. If you go out of your way to know them beyond teaching them - like knowing what their interests are, then you have MORE chances of ensuring success with each child.
    • The Good - Point out when students are showing positive characteristics in the classroom: "Bobby is ready to start class, as he used the TOOLS chart as soon as he entered today!" "Sarah really shows she is following the GROUP work criteria by giving others a chance to talk." etc. These little reminders will encourage all students. REALLY try to point out a struggling child... this can go a long way.
    • The Bad - You will have times where a student does not want to get started on their work, are stalling, are bothering others, perhaps. What do you do? First, DO NOT SWEAT THE LITTLE THINGS... meaning, if it is something that is not hindering their learning or the learning of others, ignoring it is always a great idea. Sometimes they just want attention - and it is good not to make it a habit of giving them that negative attention. If it is interfering with learning, send them on a short errand to refocus their thinking. These usually help me! Then, there are some times that are unavoidable... The Ugly!
    • The Ugly - You may come across a stinker who may just be defiant or have some emotional issues, etc. If this is the case and you have exhausted all efforts OR if students are in danger, you need to contact the office and have the student removed. I have had to do little of this, as I believe ALL my other routines, structure, and building of relationships helps to prevent this from happening. 

    Transitions:

    • Proximity - ANY time you have a transition, it is MOST important to BE in the hallway during the transition. Staying in your room and thinking they will get to the next location without difficulties (or because you have something last minute you need to do) IS a HUGE mistake. They need your body in view - this is a BIG deal. Any time I have visible during a transition, there are no issues. The only time I have seen a transition issue is when an adult was still in their room when sending the kids on to their next location... so BE there!! BE visible! 
    • Time Matters - Another important part of transitions is for ALL team members to synchronize their clocks (phones are great for this) to ensure all classes are ready and switching at the same time. If one is early and another is late, students waiting will get into trouble (leads back to the proximity tip;) and that will lead to one teacher having to watch over two classes (the one leaving and the one coming - NOT GOOD)! Avoid this as much as possible. 


    Practice Makes Perfect (Close to Perfect):

    One of my GOLDEN RULES is that nothing will work unless you are willing to invest time at the BEGINNING of the school year to practice ALL procedures and routines until they are done correctly!!!! DO NOT SKIP THIS! For lower grades (when I taught Kindergarten) it took me at least a week to establish smooth routines. For upper grades, a couple of days. DO NOT assume the teacher previous to you taught this. DO NOT assume students already know these things. THESE are BIG mistakes. If for some reason they 'get it' and do it right and later begin to slack off - be willing to STOP immediately and practice that routine. This does not happen often IF you ensure it is automatic the first few days of school ;) TRUST ME... the time you spend doing this WILL pay off in the long run and save valuable instructional time throughout the year!

    MORE... 
    There are SO many classroom management skills that I am sure I have not mentioned, so IF there is a specific routine that I did not cover (these were the first to come to mind), then please post a comment below and I will be happy to add any other routines!! I hope the information above will assist someone in some way! Thanks :)

    Thursday, 2 July 2015

    Currently July - Already??

    Wow! Summer sure is flying by... which means back to school. Don't get me wrong, I love my school babies, but also loving all the precious time with my family!

    What am I currently doing on this raining day in Georgia? Linking up with Farley:)


    I am actually in the middle of working on an awesome set that I hope to release tomorrow! I also posted my Independence Day sale in my TpT store (check it out this weekend)! In the midst of doing those things, I love to listen to light music in the background. We have a local station that plays a mixture, which I love a variety. Some new, some old, some of this, some of that...

    I have spent much quality time with my family so far this summer, and I am grateful for every moment... going by way too quickly!

    With creating and revamping some products, I have been staying up WAY too late and am totally off of my usually sleeping pattern - how many of you out there have a summer sleeping schedule that gets WAY off?? EEK! It always catches up with me the first few days back to work LOL.

    All STAR games have been going on locally and abroad... and when thinking about what I am really good at, I think about what people have constantly told me. There are two things I hear repeatedly...

    1) You are able to truly connect with your students and they respect you due to the positive relationships you form with them.

    2) You are organized and manage your classroom flow very effectively.


    I truly value the fact that I am good at something, especially the first one - it is very important to me and is the essence of what I do each day.

    I know there are so many talented educators out there... what do you feel or are told you are amazing at doing?

    post signature